

JULY 13, 2026
Before I get into career signals, I want to make it clear that this is the first workflow I've built in Attio. It was a great way to learn what's possible, but it's not running in a live workspace. I already know there are a few areas that would need more testing and refining before I'd be happy using it with real CRM data.
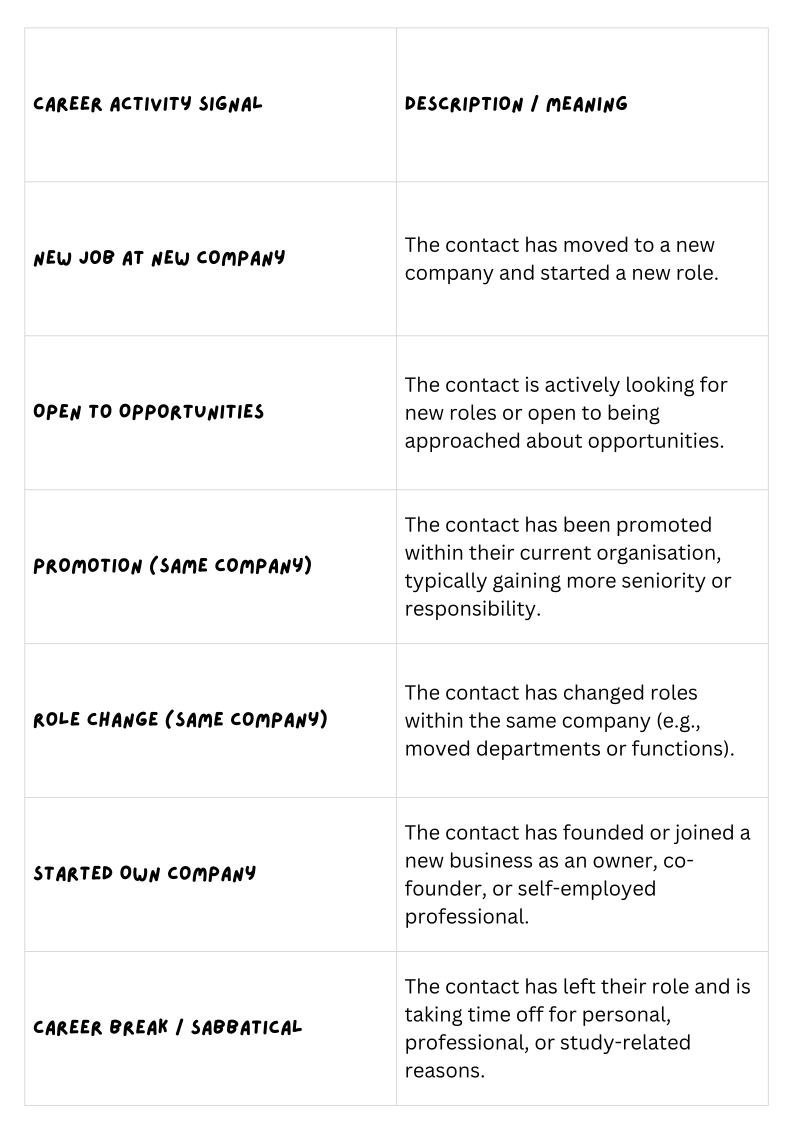
With that said, it's worth explaining what I mean by career signals. Career signals are changes in a contact's professional status that can trigger useful actions in your CRM. They help keep your data accurate, make outreach more relevant, and highlight the best moments to engage with someone.
In this example, I've stored them in a custom object called Signals. While I'm only using it for career signals at the moment, I chose a more generic name because it gives me room to expand it later. I can use the same object for other types of signals without creating lots of separate custom objects. You could create individual objects for every signal type, but I think that quickly becomes cluttered without adding much value.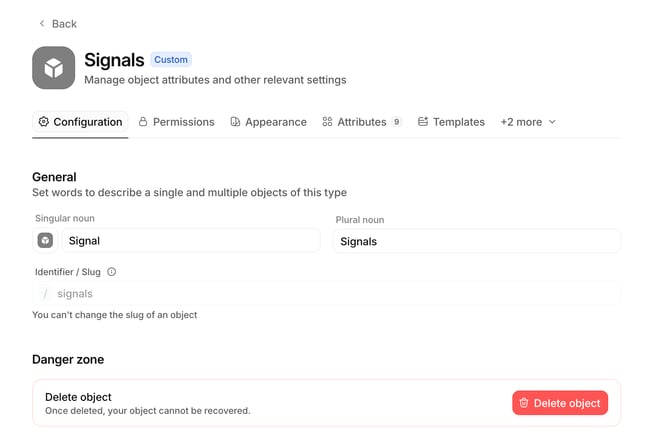
In previous CRM roles, I've mostly worked with career signals using HubSpot and Clay integrations. This time, I wanted to see what could be built natively in Attio, so I've focused on two common scenarios: Promotion (Same Company) and Role Change (Same Company). The reason I've only focused on these two is that, once you start detecting career moves between different companies, you typically need external enrichment to identify them. The workflows I've built here can work with enrichment too, but they can also run purely from a simple update to the Job title attribute, making them much easier to implement natively in Attio.
People Attributes to Create
Once you've created the custom object, the next step is to add a People attribute called Old job title. This attribute stores a contact's previous job title so the workflow can compare it against their current one whenever their title changes. It'll become clearer how it's used once we build the workflow.
For the Signals custom object, create the following attributes:
- Signal Name - Text
- Signal Date - Date
- Person - Relationship
Set the relationship to Many to one. This means many Signal records can belong to one Person, while each Signal is linked to a single person. It lets you build a historical timeline of career changes instead of only storing the latest one.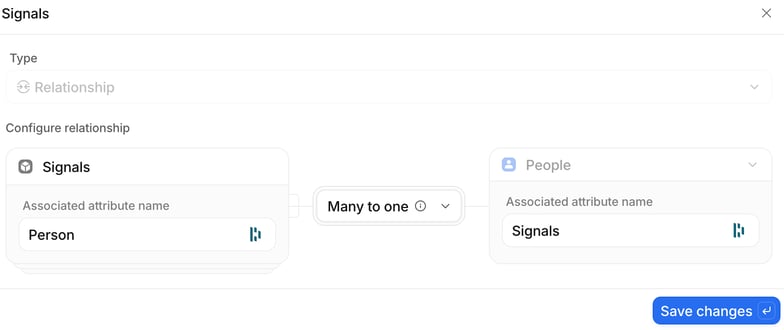
- Career Activity Reason - Text
Now that all of the required attributes have been created, you're ready to build the workflow.
Creating The Workflow
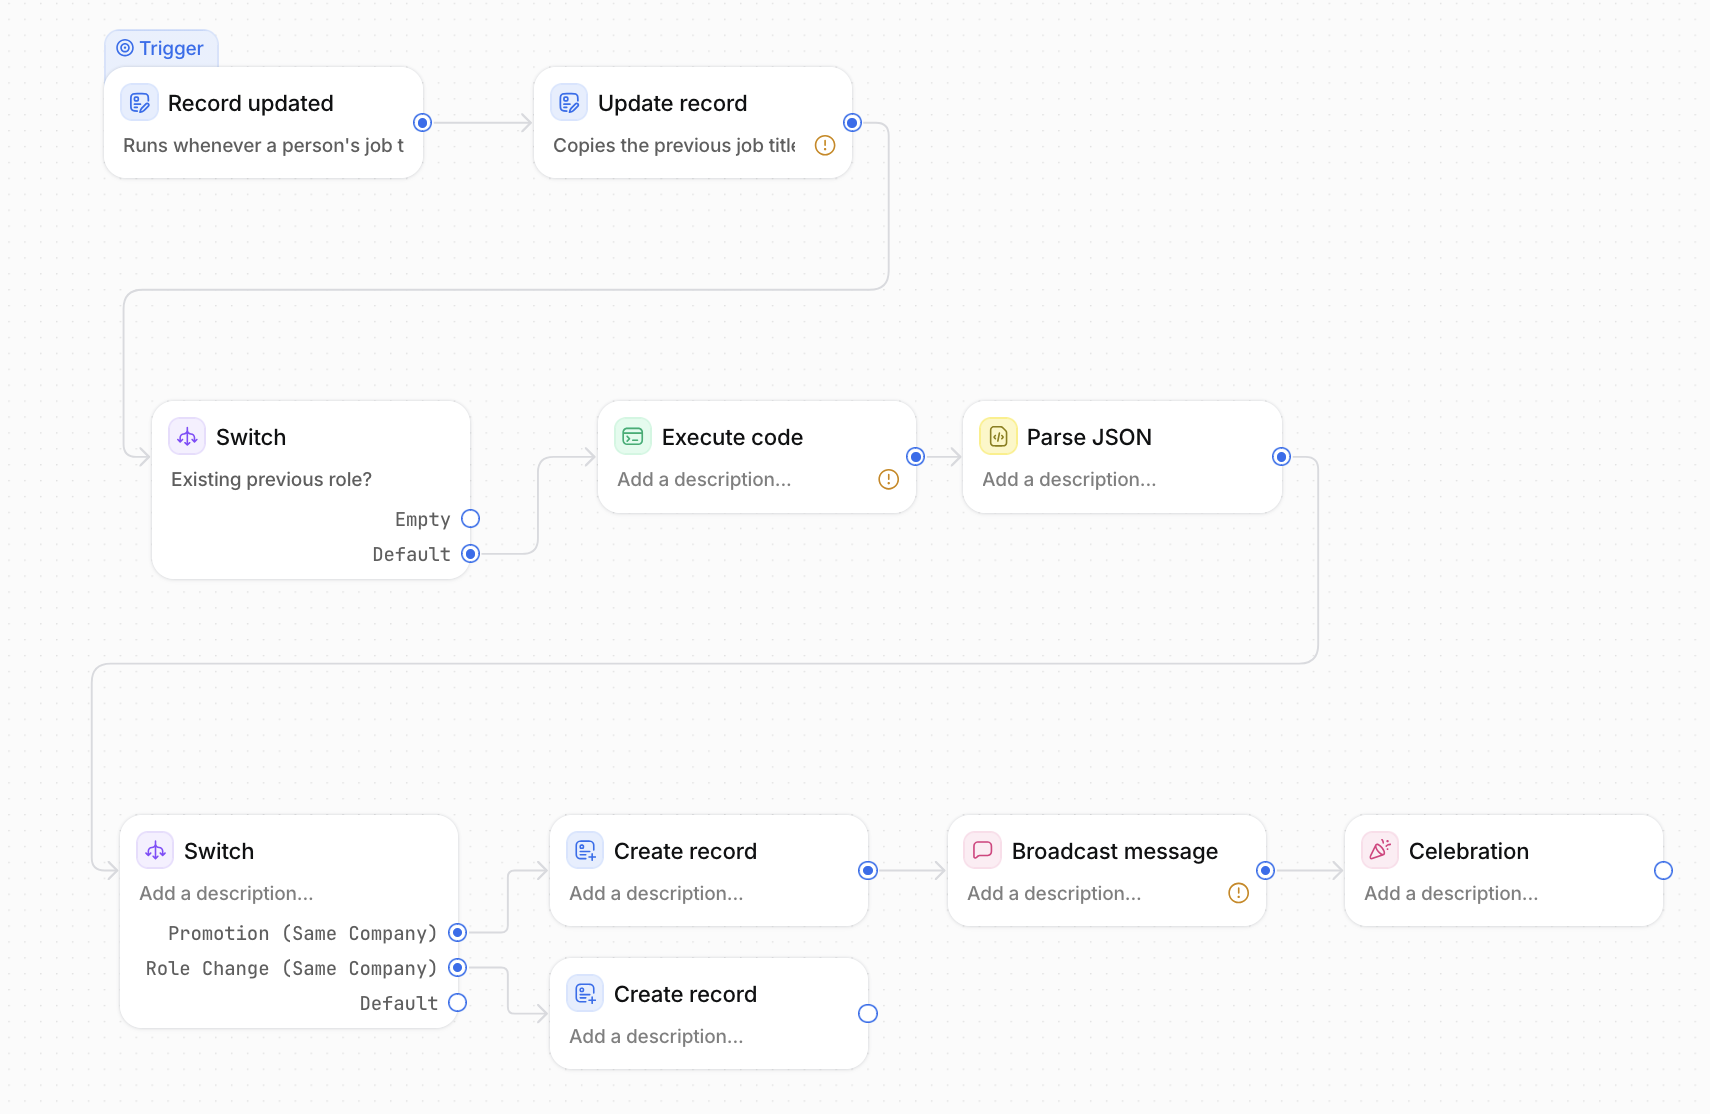
To get started, navigate to Automations → Workflows, then click New workflow.
This will create a blank workflow where we'll build the career signals automation step by step.
For the trigger, select Record updated, choose People as the object, and set the attribute to Job title.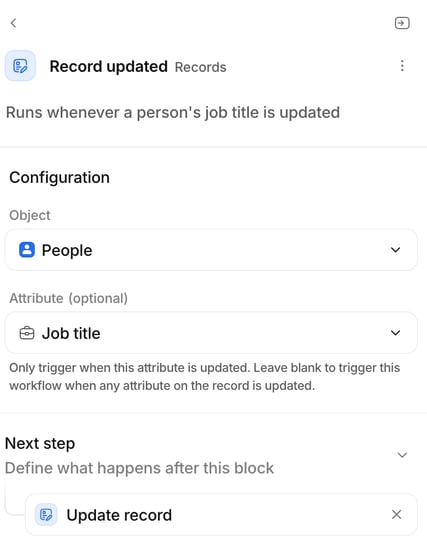
Update Record
The next step is to save the contact's previous job title before we do anything else.
Add an Update record action and configure it to update the same People record that triggered the workflow.
Set the Old job title attribute to Record updated → Previous value.
This means that every time a person's job title changes, Attio stores their old title. We'll use this value later in the workflow to compare the old and new job titles and determine whether it's a Promotion (Same Company) or a Role Change (Same Company). Without storing the previous value first, we'd have nothing to compare the new title against.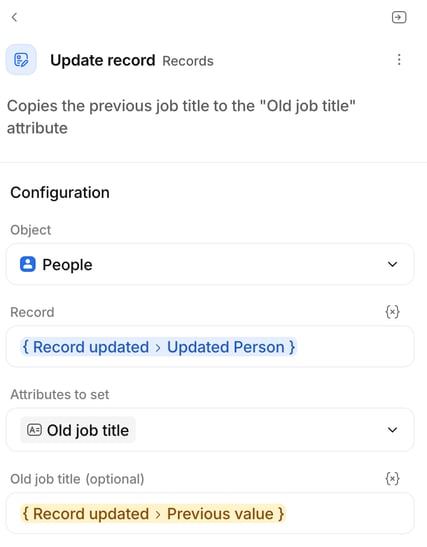
Switch #1
Before comparing job titles, I added a Switch block to check whether the person already has a previous job title stored. The switch looks at the Old job title attribute we populated in the previous step. If the value is empty, the workflow exits without doing anything. This prevents the workflow from trying to compare a new job title against a blank value, which would lead to incorrect signals.
Only records that already have an existing job title continue down the Default path.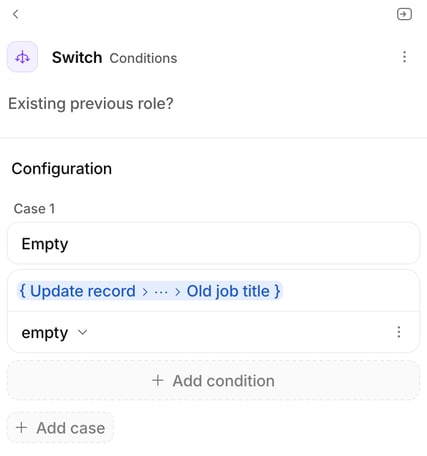
Execute Code
Next, add an Execute code block.
This is where the workflow compares the previous and current job titles and decides which career signal to create.
Create two inputs:
oldTitle - set this to Record updated → Previous value
newTitle - set this to Updated record → Job title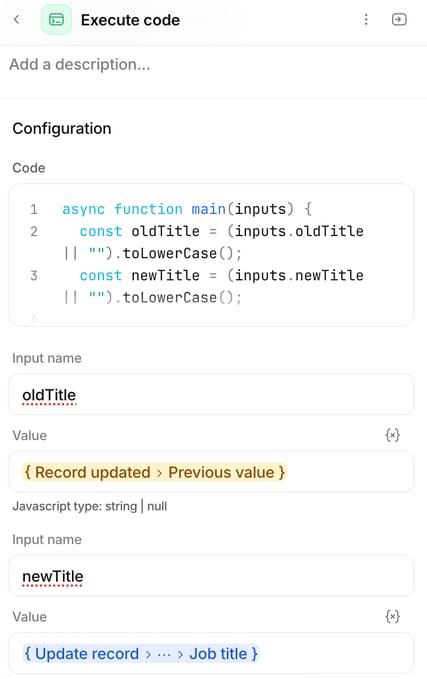
The code converts both titles to lowercase and checks whether the new title contains a seniority term that was not present in the old title. For example, a change from Marketing Executive to Senior Marketing Executive would be classified as a Promotion (Same Company). Any other title change is classified as a Role Change.
It then returns two values: the career signal and a short explanation of why that signal was selected.
As with any code-based workflow, this should be tested and refined before being used with live CRM data. Job titles are rarely completely consistent, especially when they are being enriched through an integration. One source might return CEO, while another could return Chief Executive Officer, even though the person’s role has not actually changed.
You can add different variations and exclusions to the code as you come across them. The aim here is not to create a perfect system immediately, but to give you a foundation that you can continue improving as you test it against real examples.
Parse JSON
Next, add a Parse JSON block and set the input to Execute code → Output.
In the Schema section, define the two values you want to extract from the code output: signal and careerActivityReason. This tells Attio which fields to expect and converts the raw JSON output into clearly formatted, separate values that can be selected individually in later workflow steps.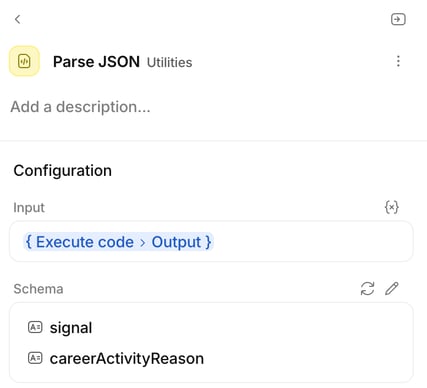
Switch #2
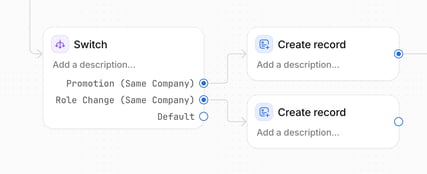
Next, add another Switch block to route the workflow based on the career signal returned by the code.
Create two cases:
Promotion (Same Company)
Role Change (Same Company)
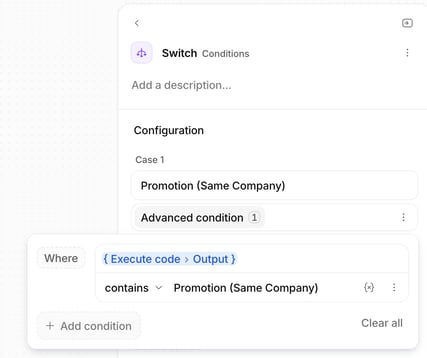
For each case, add an Advanced condition using Execute code → Output.
Set the condition to contains and enter the relevant signal name - e.g. Promotion (Same Company) for the first case and Role Change (Same Company) for the second.
This allows the workflow to follow different paths depending on the type of career change that was detected.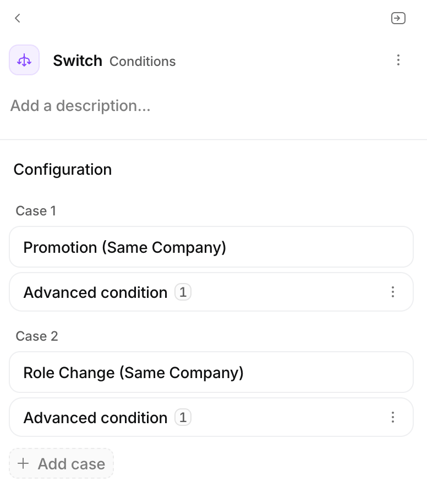
Create Record
Next, create the Career Signal record.
Add a Create record block and select your Signals custom object.
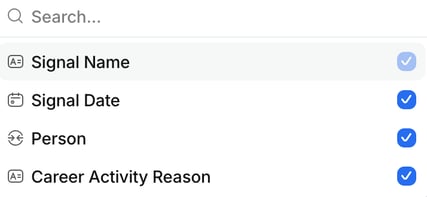
Then choose the following attributes to populate:
Signal Name
Set this to the relevant signal for the branch - e.g. Promotion (Same Company) or Role Change (Same Company).
Signal Date
Set this to the current date.
Person
Associate the signal with the person who triggered the workflow by selecting Update record → Updated Person.
Career Activity Reason
Use Parse JSON → careerActivityReason so the record includes the explanation generated by the code.
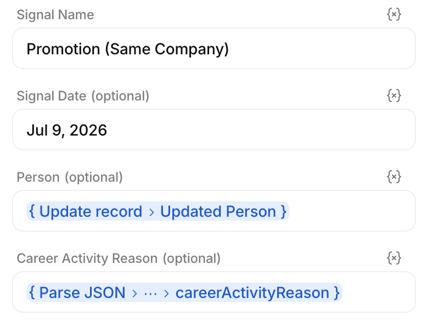
At this point, every qualifying job title change will create a new Career Signal record linked to the relevant person, making it easy to report on or automate future actions based on these career changes.
Celebrate Promotions
One of the nice things about splitting the workflow into different branches is that you can trigger additional actions depending on the career signal. In my example, I only wanted to celebrate promotions, so I added two optional blocks to the Promotion (Same Company) path.
First, I added a Broadcast message block. This displays a notification to everyone in the workspace whenever a promotion is detected. I configured the title as: 🎉 Promotion detected for {Updated Person}. This is a simple way to surface career milestones to your team without anyone having to actively monitor the CRM.
To make it even more fun, I followed this with a Celebration block using the Ceiling Drop animation, targeted at All users. This creates a small celebration in Attio whenever someone is promoted.
These two steps are completely optional, but they're a nice example of how career signals can be used for more than just reporting. They help bring important customer milestones to the attention of the whole team and make your CRM feel a little more alive.
Final Result
Once everything is connected together, each qualifying job title change creates a new Career Signal record. The record captures the type of career signal, the date it was detected, the associated person, and a human-readable explanation of why the signal was created. This gives you a central place to track career activity across your CRM, making it easy to build reports, trigger additional automations, or simply keep an eye on important customer milestones.
In my example below, the workflow detected that a contact had moved from Marketing Operations Manager to Senior Marketing Operations Manager, classified it as a Promotion (Same Company), and stored the reason alongside the record for future reference.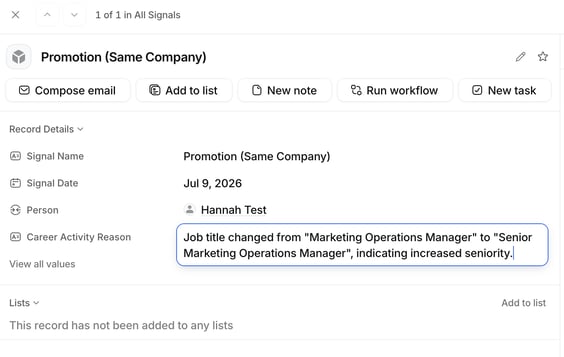
Although this is a relatively simple example, the same approach can be expanded to detect other career events, enrich records with additional context, or trigger more advanced workflows as your CRM evolves.
On a personal note, this has been a really fun project. I only started learning Attio a few days ago, and building this workflow helped me understand how much flexibility the platform offers. As a nice bonus, my posts and contributions were enough to take me to #1 on the Attio Community leaderboard over the last 7 days.
If you've built this workflow yourself or have ideas for improving it, I'd love to hear them.
I'm only just getting started with Attio, and I'm looking forward to building (and sharing) plenty more.